Although electrocardiograms (ECGs/EKGs) are performed routinely, they are not always done correctly and consistently. As such, I wrote this article to explain the proper electrocardiogram (EKG/ECG) setup and lead placement. The goal is to help standardize all ECGs.
Background
For decades, I noticed a significant inconsistency in the way electrocardiograms are performed. I asked nurses, EKG technicians, medical assistants, and even cardiology fellows where ECG leads/electrodes should be placed on the patient’s body. Most of the time the answer is “somewhere around here, and they point to areas on the arms, legs, and chest. Additionally, having interpreted tens of thousands of ECGs, I have seen significant variations in the electrocardiograms done on the same person, even in the same day.
How to Set Up a 12-Lead Electrocardiogram
A 12-lead electrocardiogram uses 10 electrodes. Four (4) of these electrodes are placed on the limbs and six (6) electrodes are placed on the chest (precordium). Please be aware that when setting up an ECG, the words electrode and lead are often used interchangeably.
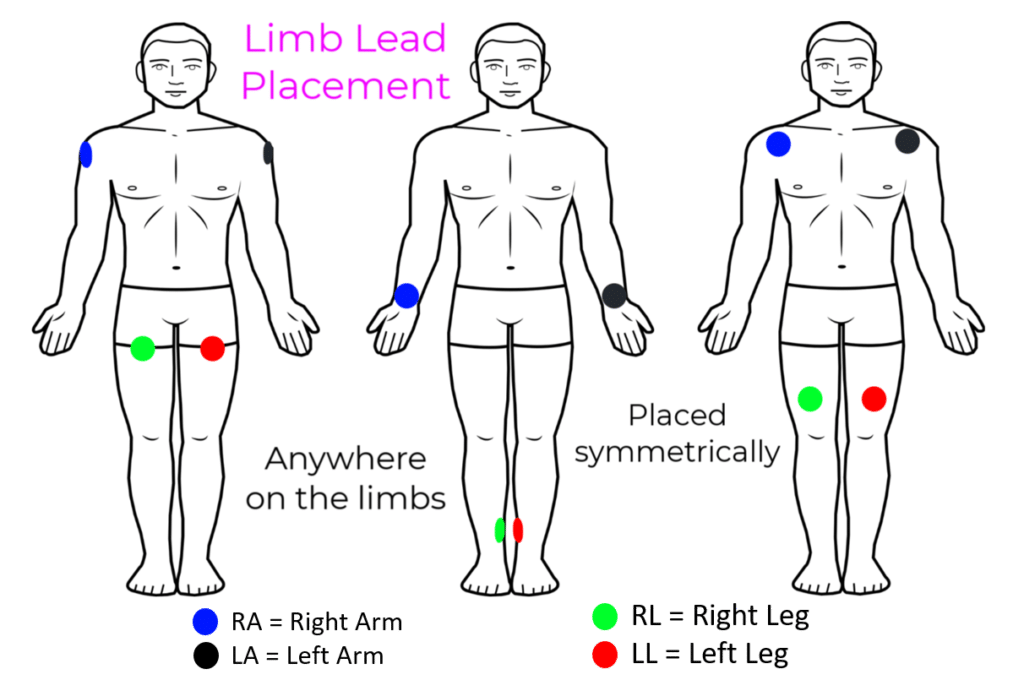
Limb Lead Placement
Setting up the limb leads is quite simple. They can essentially go anywhere on the limbs, as long as they are placed symmetrically and do not go over bone. For example, the right and left arm electrodes can go anywhere between the wrists and the shoulders but should be symmetrically placed. Similarly, the right and left leg electrodes can go anywhere between the ankles and the torso, but should also be symmetrically placed.
Click here to become an expert in reading ECGs/EKGs with ecgedu.com
Watch a video on ECG lead/electrode placement
Chest (Precordial) Lead Placement
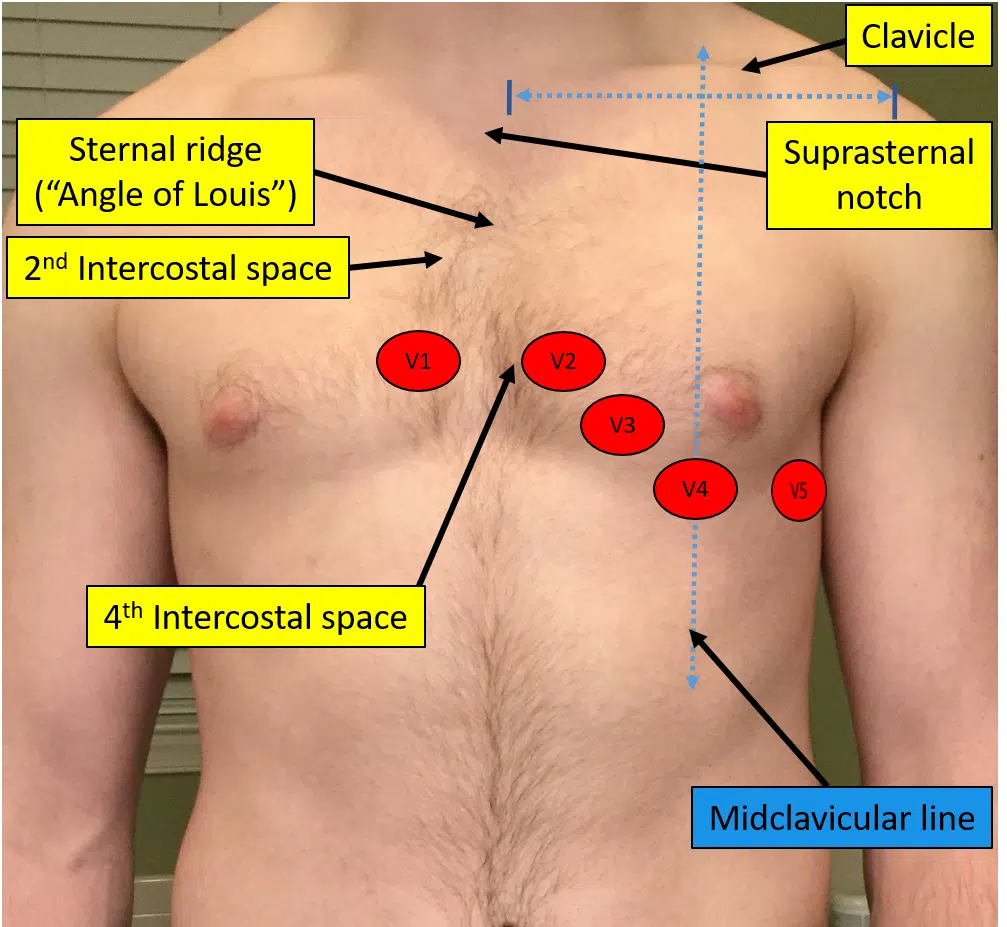
V1: 4th intercostal space, right sternal border
V2: 4th intercostal space, left sternal border
V3: Midway between leads V2 and V4
V4: 5th intercostal space, midclavicular line
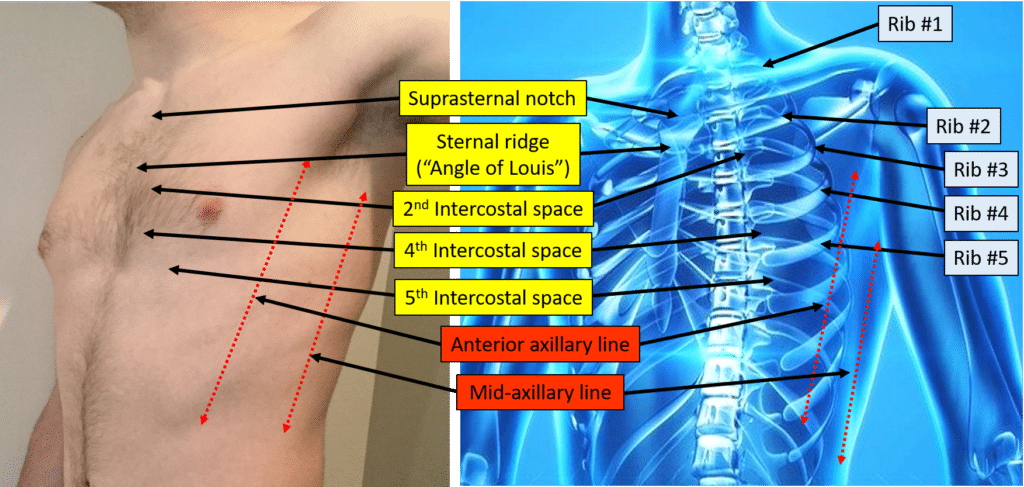
V5: 5th intercostal space, anterior axillary line
V6: 5th intercostal space, mid axillary line
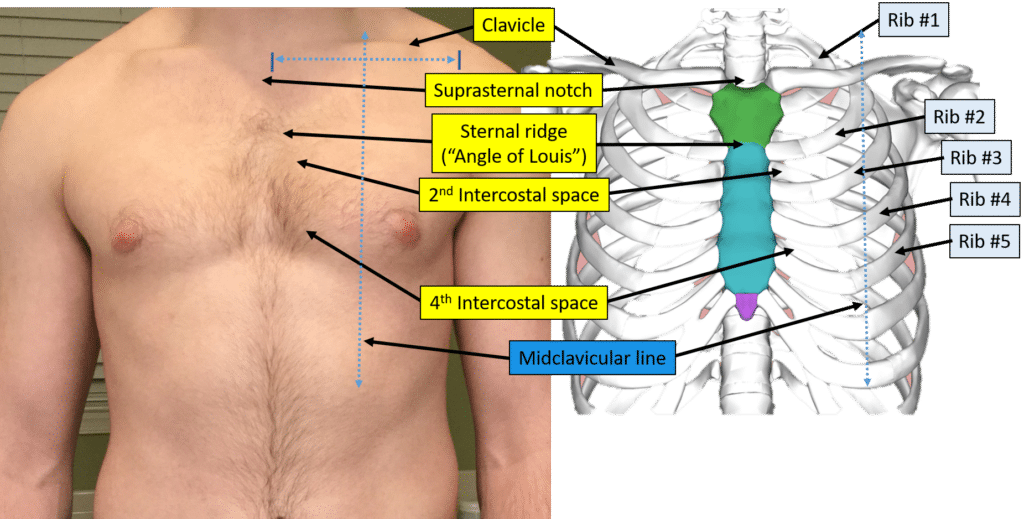
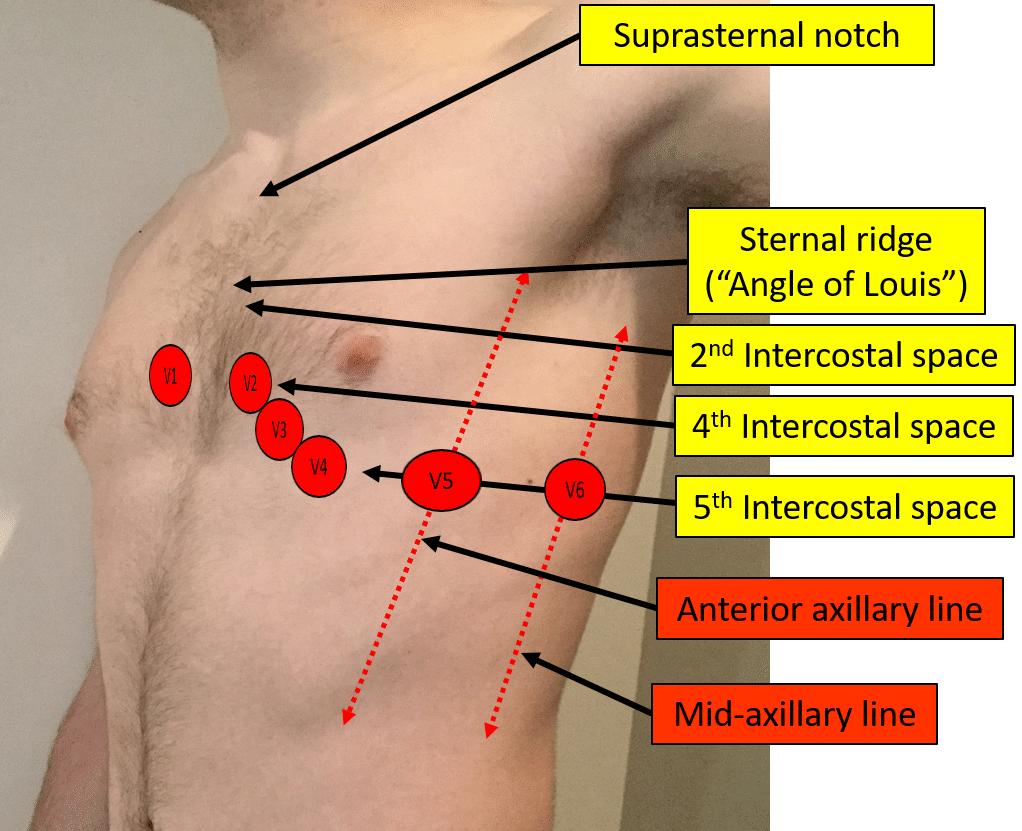
Below is a diagram showing the ribs, intercostal spaces, sternum (breastbone), and clavicle (collarbone). I will now explain how to locate the correct spots on a patient. Also, watch the video which will demonstrate this.
Let us start with some basic definitions.
Costa – Latin word for rib
Costal – in relationship to the ribs
Intercostal space (ICS) – the area of soft tissue between the ribs (e.g. 2nd ICS is the area between the 2nd and 3rd ribs)
Sternum – Breastbone
Manubrium – top portion of the sternum (shaded in green above)
Sternal body – midportion of the sternum (shaded in teal above)
Xiphoid process – bottom portion of the sternum (shaded in purple above)
Sternal ridge/angle (aka “Angle of Louis”) – area where the manubrium meets the sternal body.
Clavicle – collarbone
Clavicular – in relationship to the collarbone
Axilla – armpit
Axillary – in relationship to the armpit
The sternal ridge/angle (“angle of Louis”) is at the level of the 2nd intercostal space.
Finding the Correct Placement of Leads V1 – V6
Placement of Lead V1
Locate the sternal notch (Angle of Louis) by feeling the top portion of the breast bone, and moving your fingers downward until you feel a bump. Move your fingers to the right, off of the bump, and you will feel some soft tissue in between the 2nd and 3rd rib. This is the 2nd intercostal space. Gently move your fingers over the 3rd rib to the 3rd intercostal space, and then over the 4th rib to the 4th intercostal space. The electrode is placed here (4th intercostal space right sternal border).
Placement of Lead V2
Since you have placed lead V1, you can now put the electrode for lead V2 at the same level to the left side of the sternum (4th intercostal space, left sternal border). You could also follow the same instructions for V1, but again place the lead on the left side of the sternum.
Placement of Lead V4
V4 should be placed before lead V3. First, identify the midclavicular line. This is the midpoint of the left clavicle (collarbone). Start by finding the suprasternal notch at the top of the sternum (breastbone). Move your finger slightly to the left to find the end medial edge of the clavicle. Put your fingers from the other hand on the outside of the left shoulder. Move them slightly forward and to the midline about half an inch to find the distal end of the left clavicle. From there, imagine the midpoint on the clavicle and mark it visually or with a finger. Imagine all line running straight down from this point on the clavicle. From the intercostal space associated with V2 (4th intercostal space), move your fingers down over the 5th rib to the 5th intercostal space. Place lead V4 in the 5th intercostal space, in the midclavicular line.
Placement of Lead V3
V3 is placed directly between leads V2 and V4.
Placement of Lead V5
To place the electrode for lead V5 start in the intercostal space associated with lead V4 (5th intercostal space) and move to the left to an imaginary line associated with the front portion of the armpit going down toward the anterior hip. Hence, V5 is in the 5th intercostal space, anterior axillary line.
Placement of Lead V6
From lead V5, move your fingers to the left, staying in the 5th intercostal space, until you reach an imaginary line that goes from the middle of the armpit down toward the hip. This line represents the mid-axillary line. V6, therefore, is placed in the 5th intercostal space, mid-axillary line.
Other Considerations
Breast tissue can have an impact on the electrocardiogram. As such, the electrode for lead V4 should be placed underneath the breast tissue in women. If necessary, the electrode for lead V5 should also be placed underneath breast tissue.
Always record any alterations in electrode positioning from standard on the ECG. This alerts the ECG reader and helps explain aberrancies.
Learn about lead placement, interpreting 12-lead electrocardiograms, and much more with Executive Electrocardiogram Education (ecgedu.com), an all-inclusive, online video course. You will learn all of the ECG and arrhythmia basics, such as lead placement, atrial and ventricular arrhythmias, myocardial ischemia, injury, and infarction, plus much more. Additionally, you will learn an approach to reading ECGs and arrhythmias that is not offered in other courses. Check out the sample videos and at the very least sign up for the free advanced cardiac life support (ACLS) video tutorial and quiz or take our EKG practice test.
Watch a video on ECG lead/electrode placement
Click here to become an expert in reading ECGs/EKGs with ecgedu.com